
Why Re-Engagement Strategies Matter
Over time, it’s natural for some subscribers to stop opening your newsletters. However, continuing to send emails to inactive contacts can hurt your sender reputation, pushing your emails into spam folders for all your readers.
A targeted re-engagement strategy helps you:
- Boost Open & Click Rates: Focus your efforts on readers who are most likely to reactivate.
- Protect Sender Reputation: Avoid high spam complaint rates and soft bounces.
- Keep Lists Clean: Identify true unengaged contacts so you can sunset or unsubscribe them.
💡Our Recommendations:
Resending campaigns too frequently to unopened contacts can overwhelm your readers, leading to list fatigue, higher unsubscribe rates, and spam flags.
- Recommended Frequency: We suggest running a full re-engagement push once every 6 months.
- Give Options: When reaching out to inactive readers, offer them a clear choice—either a compelling reason to stay (like a special offer or top content round-up) or an easy way to update their email preferences.
How to Set Up a 3-Step Re-Engagement Campaign
Follow this self-guided workflow to filter, tag, segment, and automatically track your inactive contacts.
Step 1: Filter and Tag Inactive Contacts
First, you need to identify who hasn't been opening your newsletters and label them with a dedicated tag (e.g., Re-engagement 08.26).
- Navigate to the Contacts page in your dashboard.
- Open the Filter tool and choose the Email Activity (Time Period) rule.
- Select your desired criteria:
- Did Not Open: Pulls contacts who haven't opened any emails in the selected timeframe.
- Not Engaged: Pulls contacts who have very low engagement (e.g., opened rarely, clicked nothing).
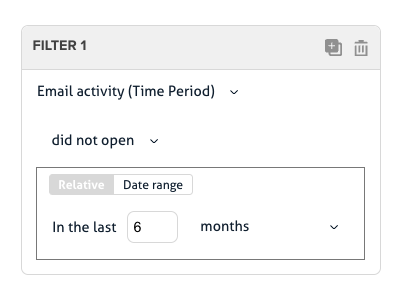
- Set your time frame to 6 months (or your preferred duration) and run the filter.
- Select all the contacts resulting from this search.
- In the floating menu at the bottom of your screen, click Actions > Add or Remove Tags.
- Select (or create) your new tag (e.g.,
Re-engagement 08.26) to apply it to all selected contacts.
Step 2: Create a Saved Re-Engagement Segment
Now that your contacts are tagged, you’ll want to group them into a dedicated segment so you can easily send your target campaign to them when you're ready.
- Go to the Contacts page.
- In the left-hand menu under All Contacts, click the Create Segment button.
- Name your segment (e.g., Re-engagement List - Aug 2026).
- Set the segment filter tool to display contacts who possess the tag you created in Step 1.
- Save your segment.
💛 Now, whenever you draft your re-engagement email, simply select this saved segment as your recipient list!
Step 3: Automate the Process (Monthly Auto-Tagging)
To save time in the future, set up a recurring automation that constantly scans your list and tags contacts as soon as they meet your inactivity criteria.
- Navigate to the Automations page.
- Click the round
+(Plus) button in the top right corner to create a new automation. - Select your main mailing list, then add a clear Name and Description (e.g., Monthly Re-Engagement Tagging).
- Choose Recurring Journey as your setup style and set the Marketing Goal to Manage Audience.
- You will land on the Automation Editing page. Configure your 3 trigger blocks:
Block 1: Frequency
- Click the first trigger block.
- Set the frequency to Once a Month.
Block 2: Condition Filter
- Click the grey
+(Plus) sign below the first block to add a second block. - Select Condition > Contact must match all conditions.
- Set up the Filter tool exactly as you did in Step 1 (e.g., Email Activity (Time Period) > Did not open > Past 6 months).
Block 3: Action Tag
- Click the grey
+(Plus) sign below the second block to add a third block. - Select Actions > Tag/Untag Contacts > Action Tag.
- Choose your re-engagement tag.
What's Next?
Your system is now set up to automatically group inactive readers every month!
Whenever you're ready to run your 6-month re-engagement push, draft your campaign, target your saved segment, and give those quiet subscribers a reason to fall in love with your content all over again.