
When you share a link to your site on social media or in messaging apps, a preview image automatically appears. If a specific page or post doesn't have a featured image set, your site relies on a default social media image.
This guide covers how to set or update this default image and how to test your link previews.
Note: Setting a default social image controls what appears on external social media platforms. To set a default fallback image for posts within your own website layout, please refer to this help article.
Setting Your Default Social Media Image
To change the default image used for social media sharing:
- Log in to your site’s admin dashboard.
- Navigate to SEO in the side menu.
- Select Site Basics.
- Look for the Site Image field.
- Upload or select your preferred default image.
- Save your changes.
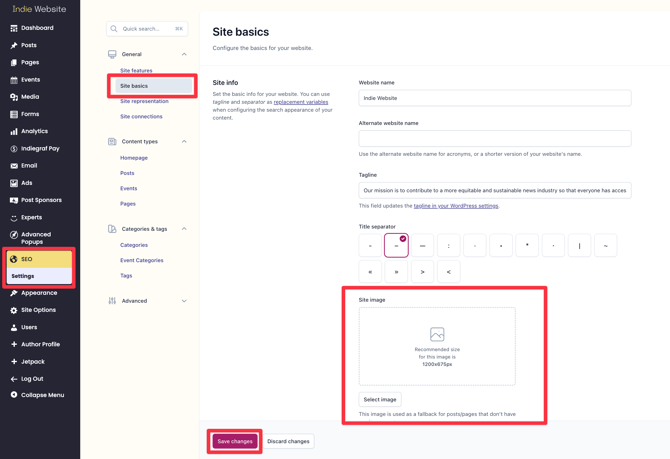
Image Recommendations
To ensure your default image looks sharp across all social platforms, we recommend:
- Standard dimensions: 1200 x 675 pixels (16:9 ratio)
- Minimum dimensions: 600x315 pixels
- Format: PNG or JPG
- Content: Use a clear, high-resolution logo or brand image that represents your publication well on any page
How to Test Your Link Previews
After updating your default image, test a page on your site that does not have an image to confirm the new image appears:
- Use free testing tools like Social Share Preview or Social Media Share Preview
- Paste your page URL into the tool to see how the card renders across different platforms.
Note (Social Media Caching): Social media networks often cache link previews for up to 7–14 days. If your new image doesn't appear right away on a platform like Facebook or X, you may need to use their native debugger tools (e.g., Facebook Sharing Debugger) to force a cache refresh.