
This article will show you how to serve email ads through Indie Ad Manager. You will learn how to:
- Create an email ad zone.
- Add an email ad items.
- Configure an email zone tag.
- Set an email zone tag in an email template.
Step 1: Create an email ad zone

- Go to the section of the relevant publisher (Your Indie Ad Manger > Publishers > Your Publisher).
- Click on Add Zone under the Zones table. The Zone Type window will appear.
- Click on Email.
- Give the ad zone a name. It helps to name zones clearly and consistently to make them easy to identify throughout the Indie Ad Manager interface.
- Select one of the preset dimensions or enter the size of the email ad items to be served in the zone.
- You can enable ad rotation by clicking Specific under Ad Persistence Window, then entering a period in minutes or days. When enabled, Indie Ad Manager will serve a different ad based on your chosen period.
- Click Create Zone to save the new email ad zone. It will appear in the table of zones in the publisher's section.

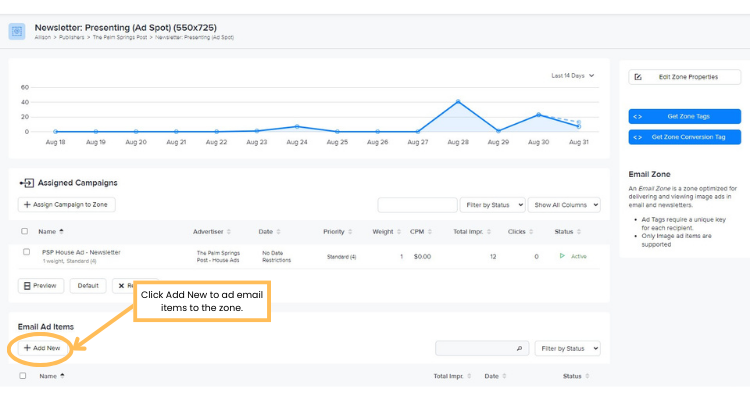
Step 2: Add an email ad item
Indie Ad Manager is able to serve image ad items to email ad zones. We are limited to serving image ads because almost all email clients block other types of ads.
- Go to the section of the relevant email ad zone (Your Indie Ad Manager > Publishers > Your Publisher > Your Email Ad Zone).
- Click on Add New above the Email Ad Items table. The New Ad Item settings will appear.
- Select a serve method, the rest of the settings will appear.
There are two methods available to determine how an assignment will be served: fixed delivery and auction.- The fixed delivery method serves ads based on weight and quotas relative to other assignments.
- The auction method submits a bid and will serve if it wins against other auction-based ads.
- Note: you will almost always be choosing the fixed delivery option.
- Give the ad item a name. Fill in the rest of the fields as needed.
- Click Save. The new image ad item will appear in the table of ad items in the email ad zone section.

✨ You can also create an advertiser campaign and assign them to your email ad zone. As with individual ad items, campaigns for emails must include image ad items.
Step 3: Configure an email zone tag
For ad items to rotate and track clicks properly, email ad zone tags require an Email User ID macro (EUID). Email providers have different implementations for the EUID. See Common Newsletter Email Unique IDs for a list of EUIDs from major email providers. If your provider's EUID isn't on the list, contact our support team at sponsorship@indiegraf.com for help.

-
Go to the section of the relevant email ad zone (Your Indie Ad Manager> Publishers > Your Publisher > Your email zone).
-
Click Get Zone Tags in the right menu of the email ad zone section. The Zone Tags window will appear.
- Paste your email provider's EUID in the Email User ID Macro field. The example shown below uses Mailchimp's EUID.
- You can now copy the zone tag and add it to the body of your email template.

Step 4: Set the email ad zone tag
- Create a custom email template where you will add your zone tag. Look for the field in the template where you can place a snippet of code, such as the zone tag.
- In the HTML field, paste your zone tag code inside the section or wherever you want your ad to appear inside the newsletter. Be sure to save your template.
When you send out your email newsletter using this template to your subscribers, any ads assigned to that zone tag will appear within the email.
Example: Setting the zone tag in an Indie Email platform email template
- Configure and copy your email ad zone tag as shown in step 3. Indie Email's EUID is %SUBSCRIBERID%%MESSAGEID%.
- Log in to your Indie Email account, then click Campaigns in the left navigation menu.
- Click Create a Campaign then select the campaign type. This is typically a Standard campaign.
- Name the email then click Next.
- Select the list(s) you would like this campaign to send to then click Next.
- Choose a Template Type, either Email Designer or Custom HTML. Click Continue.
- You will be asked to select a template. To choose a custom built template, select Basic Templates, select Custom and choose your template.
- Ensure the Sender Details are correct, include an email subject (this can be changed later). Click Continue.
- Click Design at the top of the email template creator.
- Under Blocks, drag an HTML content block to the location within the newsletter you want your ad to appear.
- Click on the block and a text window will appear, Paste in your zone tag.
- Any ads assigned to that zone will populate your display ad based on scheduling and weighting.
Example: Setting the zone tag in a Mailchimp email template
- Configure and copy your email ad zone tag as shown in Step 3. Mailchimp's EUID is
*|CAMPAIGN_UID|*-*|UNIQID|*. - Log in to your Mailchimp account, then click Create in the left navigation menu.
- Click Email then select either Regular or Plain text.
- Name the email then click Begin.
- Click Design Email in the email template creator. You will be asked to select a template.
- Click on the Code your own tab.
- Click on Paste in code.
- Create your template in the text field, then add the zone tag into the template's body.