---
title: How to export Stripe contacts for email marketing
description: Learn how to export contact data from Stripe and import it into Mailchimp to streamline your email marketing campaigns.
---
[Skip to content](https://help.indiegraf.com/how-to-export-stripe-contacts-for-email-marketing#main-content)
English
Show submenu for translations
[Publisher Portal](https://portal.indiegraf.com/tickets?hsLang=en)
[](https://help.indiegraf.com/?hsLang=en)
Open main navigation
Close main navigation
- English
Show submenu for translations
- [Publisher Portal](https://portal.indiegraf.com/tickets)
How can we help you?
- There are no suggestions because the search field is empty.
1. [Indiegraf](https://help.indiegraf.com/?hsLang=en)
2. [RevEngine](https://help.indiegraf.com/revengine?hsLang=en)
3. [Analytics and Reporting](https://help.indiegraf.com/revengine?hsLang=en#analytics-and-reporting)
May 28, 2026
# How to export Stripe contacts for email marketing
## Learn how to export contact data from Stripe and import it into Mailchimp to streamline your email marketing campaigns.
Transferring contacts from Stripe to Mailchimp can help put all of your contacts in one place for easy and ongoing campaigning.
In this article, you will learn how to export your contacts from Stripe and customize those exports so you can organize your contacts more efficiently.
### **Taking contacts out of Stripe**
All payments from the checkout page are logged in Stripe, and each contains your contributor’s contact information, which you’ll need for Mailchimp campaigns. To take this data out, you’ll need to perform a **Stripe Export.**
1. Log into Stripe and select **Payments** to find all customers who recently made a payment to your newsroom. From there, click on the **Export** button.
2. In the **Date range** section, select **Custom** and along with a range. For example, you could use those who have sent a contribution in the past 12 months.
3. In the **Columns** section, select the **Default** option and then submit by clicking **Export** again.
4. You will receive a [CSV](https://www.howtogeek.com/348960/what-is-a-csv-file-and-how-do-i-open-it/) file, which you can choose to have sent via email or download directly. If this takes a long time to load, don’t worry, you’re likely receiving **a lot** of data.
### **Creating customized exports**
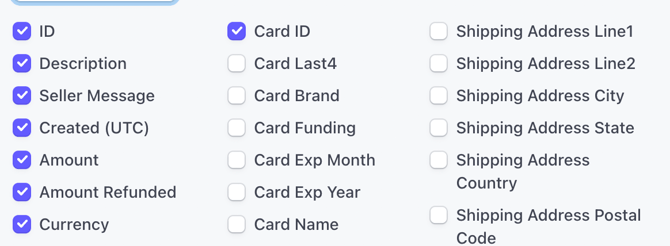
You might need more precise data than a simple selection of all payments made in the last year. On the payments page, you can refine your selection of payments by clicking on the **Date, Amount, Status,** and **Payment Method** filters.
The default selections contain most of the information most users would need for importing audience segments to Mailchimp. However, there are more options available and they can be accessed in the dropdown menu. You can select as many filters as you’d like.
### **Importing and tagging contacts in Mailchimp**
1. Login to your Mailchimp account and navigate to the **Audience dashboard**.
2. Select **Manage Audience**, which will open a pick-list where you can select the option to **import contacts**. You’ll be prompted for an import method, in this case, you should select **Upload a file** so that you can import the **.csv** file you just downloaded from Stripe.
3. Some contributors in the .csv file might already be in your Mailchimp audience. If you want to update these contacts, be sure to select **Update any existing contacts** before completing the import process. Otherwise, Mailchimp will only import contacts that are not already on your list.
4. When prompted to tag your contacts, create a new tag that describes this segment, such as `2023-03-22 member import`. If you're new to Mailchimp tags, [click here to learn more](https://mailchimp.com/help/getting-started-tags/).
5. When prompted to match fields, you should generally only need to match email address. However, if your export has good name data, you can match that as well. Just keep in mind that when you choose to **Update any existing contacts**, you elect to overwrite anything that’s currently in those Mailchimp fields.
6. Select **Complete Import**.
### **Column matching between Stripe and Mailchimp**
You might have noticed in the video example that when we attempted to import Stripe data to Mailchimp, the only accepted column was email. This is because it was the only column name that matched our Stripe and Mailchimp configurations. This works in this instance since we’re only interested in seeing who gave in the past year and the donor’s email was enough to determine this, but you might want to include more information if you’re looking to filter your results further.
To include more filters, click on the edit icons next to each column name from your import, and edit the names so that they match columns in Mailchimp. If you don’t do this, data contained in unmatched columns **will** **not** be imported
- [Welcome to Indiegraf](https://help.indiegraf.com/welcome-to-indiegraf?hsLang=en)
- [Onboarding](https://help.indiegraf.com/onboarding?hsLang=en#main-content)
- [Quick Start Guide](https://help.indiegraf.com/onboarding?hsLang=en#quick-start-guide)
- [Indie Website](https://help.indiegraf.com/indie-website?hsLang=en#main-content)
- [Analytics & Growth](https://help.indiegraf.com/indie-website?hsLang=en#analytics-growth)
- [Audience Engagement & Forms](https://help.indiegraf.com/indie-website?hsLang=en#audience-engagement-forms)
- [Configuring your Homepage](https://help.indiegraf.com/indie-website?hsLang=en#configuring-your-homepage)
- [Content Creation & Management](https://help.indiegraf.com/indie-website?hsLang=en#content-creation-management)
- [Design & Page Layout](https://help.indiegraf.com/indie-website?hsLang=en#design-page-layout)
- [Indiegraf Pay](https://help.indiegraf.com/indie-website?hsLang=en#indiegraf-pay)
- [Media & Visual Assets](https://help.indiegraf.com/indie-website?hsLang=en#media-visual-assets)
- [Paywall Solution: Pelcro](https://help.indiegraf.com/indie-website?hsLang=en#paywall-solution-pelcro)
- [SEO and Google Tools](https://help.indiegraf.com/indie-website?hsLang=en#seo-and-google-tools)
- [Site Administration](https://help.indiegraf.com/indie-website?hsLang=en#site-administration)
- [Technical Questions](https://help.indiegraf.com/indie-website?hsLang=en#technical-questions)
- [Indie Email](https://help.indiegraf.com/indie-email?hsLang=en#main-content)
- [Quickstart Video Guide: Indie Email](https://help.indiegraf.com/indie-email?hsLang=en#quickstart-video-guide-indie-email)
- [Account Setup & Foundations](https://help.indiegraf.com/indie-email?hsLang=en#account-setup-foundations)
- [Contact Management](https://help.indiegraf.com/indie-email?hsLang=en#contact-management)
- [Creating Campaigns](https://help.indiegraf.com/indie-email?hsLang=en#creating-campaigns)
- [Sending Campaigns & Automation](https://help.indiegraf.com/indie-email?hsLang=en#sending-campaigns-automation)
- [Troubleshooting & Deliverability](https://help.indiegraf.com/indie-email?hsLang=en#troubleshooting-deliverability)
- [Analytics](https://help.indiegraf.com/indie-email?hsLang=en#analytics)
- [Indie Ads Manager (IAM)](https://help.indiegraf.com/indie-ads-manager-iam?hsLang=en#main-content)
- [Reporting & Statistics](https://help.indiegraf.com/indie-ads-manager-iam?hsLang=en#reporting-statistics)
- [Essential Articles](https://help.indiegraf.com/indie-ads-manager-iam?hsLang=en#essential-articles)
- [Native Ad Templates](https://help.indiegraf.com/indie-ads-manager-iam?hsLang=en#native-ad-templates)
- [Quick Start Guide](https://help.indiegraf.com/indie-ads-manager-iam?hsLang=en#quick-start-guide)
- [Payment Solutions](https://help.indiegraf.com/indie-ads-manager-iam?hsLang=en#payment-solutions)
- [Hearken](https://help.indiegraf.com/hearken?hsLang=en#main-content)
- [Planning and Preparing to Launch with Hearken](https://help.indiegraf.com/hearken?hsLang=en#planning-and-preparing-to-launch-with-hearken)
- [Collecting Questions](https://help.indiegraf.com/hearken?hsLang=en#collecting-questions)
- [Collecting Votes](https://help.indiegraf.com/hearken?hsLang=en#collecting-votes)
- [Reporting an Answer](https://help.indiegraf.com/hearken?hsLang=en#reporting-an-answer)
- [Spreading Hearken Across Your Organization](https://help.indiegraf.com/hearken?hsLang=en#spreading-hearken-across-your-organization)
- [Creating and Customizing an Embed](https://help.indiegraf.com/hearken?hsLang=en#creating-and-customizing-an-embed)
- [Workflow Features](https://help.indiegraf.com/hearken?hsLang=en#workflow-features)
- [Platform Features](https://help.indiegraf.com/hearken?hsLang=en#platform-features)
- [Setting Up Notifications and Alerts](https://help.indiegraf.com/hearken?hsLang=en#setting-up-notifications-and-alerts)
- [Setting up APIs and webhooks](https://help.indiegraf.com/hearken?hsLang=en#setting-up-apis-and-webhooks)
- [Data collection and exporting](https://help.indiegraf.com/hearken?hsLang=en#data-collection-and-exporting)
- [Automatic categorization](https://help.indiegraf.com/hearken?hsLang=en#automatic-categorization)
- [Social, outreach, and marketing](https://help.indiegraf.com/hearken?hsLang=en#social-outreach-and-marketing)
- [Events and In-Person Engagement](https://help.indiegraf.com/hearken?hsLang=en#events-and-in-person-engagement)
- [Monetizing your Hearken work](https://help.indiegraf.com/hearken?hsLang=en#monetizing-your-hearken-work)
- [Indiegraf Experts](https://help.indiegraf.com/indiegraf-experts?hsLang=en)
- [Indiegraf Product Release Notes](https://help.indiegraf.com/indiegraf-product-release-notes?hsLang=en#main-content)
- [Product Demo Videos](https://help.indiegraf.com/indiegraf-product-release-notes?hsLang=en#product-demo-videos)
- [General](https://help.indiegraf.com/general?hsLang=en)
- [RevEngine](https://help.indiegraf.com/revengine?hsLang=en#main-content)
- [Getting Started with RevEngine](https://help.indiegraf.com/revengine?hsLang=en#getting-started-with-revengine)
- [International giving](https://help.indiegraf.com/revengine?hsLang=en#international-giving)
- [RevEngine Core](https://help.indiegraf.com/revengine?hsLang=en#revengine-core)
- [Organization management](https://help.indiegraf.com/revengine?hsLang=en#organization-management)
- [Working with Stripe](https://help.indiegraf.com/revengine?hsLang=en#working-with-stripe)
- [Contribution page basics](https://help.indiegraf.com/revengine?hsLang=en#contribution-page-basics)
- [Customizing your page](https://help.indiegraf.com/revengine?hsLang=en#customizing-your-page)
- [Branding and images](https://help.indiegraf.com/revengine?hsLang=en#branding-and-images)
- [Advanced page settings & features](https://help.indiegraf.com/revengine?hsLang=en#advanced-page-settings-features)
- [Portal & contribution management](https://help.indiegraf.com/revengine?hsLang=en#portal-contribution-management)
- [Contribution data](https://help.indiegraf.com/revengine?hsLang=en#contribution-data)
- [Analytics and Reporting](https://help.indiegraf.com/revengine?hsLang=en#analytics-and-reporting)
- [Best Practices and Recommendations](https://help.indiegraf.com/revengine?hsLang=en#best-practices-and-recommendations)
- [Receipts, reminders and transactional communications](https://help.indiegraf.com/revengine?hsLang=en#receipts-reminders-and-transactional-communications)
- [Security & Legal](https://help.indiegraf.com/revengine?hsLang=en#security-legal)
- [Common issues](https://help.indiegraf.com/revengine?hsLang=en#common-issues)
[](https://help.indiegraf.com/?hsLang=en)
Indiegraf is on a mission to make local news entrepreneurship a great career and life choice for journalists everywhere.
[mailto:support@indiegraf.com](mailto:support@indiegraf.com)
Copyright © 2025, Indiegraf Media
```json
{
"@context" : "https://schema.org",
"@type" : "VideoObject",
"contentUrl" : "https://47815976.fs1.hubspotusercontent-na1.net/hubfs/47815976/video_assets/213804603248/inherited/web_optimized.mp4",
"dateModified" : "2026-05-28T20:48:34.420Z",
"duration" : "PT23S",
"height" : 1800,
"name" : "954AEFA0-837F-449F-A0FF-D885FB949977_2_0_a",
"thumbnailUrl" : "https://join.indiegraf.com/hubfs/954AEFA0-837F-449F-A0FF-D885FB949977_2_0_a.mov/medium.jpg",
"uploadDate" : "2026-05-28T20:48:04.649Z",
"width" : 2880
}
```
```json
{
"@context" : "https://schema.org",
"@type" : "VideoObject",
"contentUrl" : "https://47815976.fs1.hubspotusercontent-na1.net/hubfs/47815976/video_assets/213804670025/inherited/web_optimized.mp4",
"dateModified" : "2026-05-28T20:48:15.155Z",
"duration" : "PT48S",
"height" : 1800,
"name" : "Screen Recording 2022-03-23 at 1.31.38 PM",
"thumbnailUrl" : "https://join.indiegraf.com/hubfs/Screen%20Recording%202022-03-23%20at%201.31.38%20PM.mov/medium.jpg",
"uploadDate" : "2026-05-28T20:48:01.177Z",
"width" : 2880
}
```