
Note: If your publication uses Indie Ads Manager, you will want to read this article about serving ads.
In order to place standard display ads on your website, you will need access to the back end of your website and to Display Ads. If you don't see Display Ads or are unsure of how to log into the back end of your website, please get in touch with your Publisher Guide!
Serving a Standard Image Ad
Image ads include an image and a destination URL. To set up and serve an ad on your website, follow these steps:
- Log into your website. From the Dashboard, click on Display Ads > Ads. From this page you will be able to see all ads on the site, edit those ads, create new, and see statistics:
-
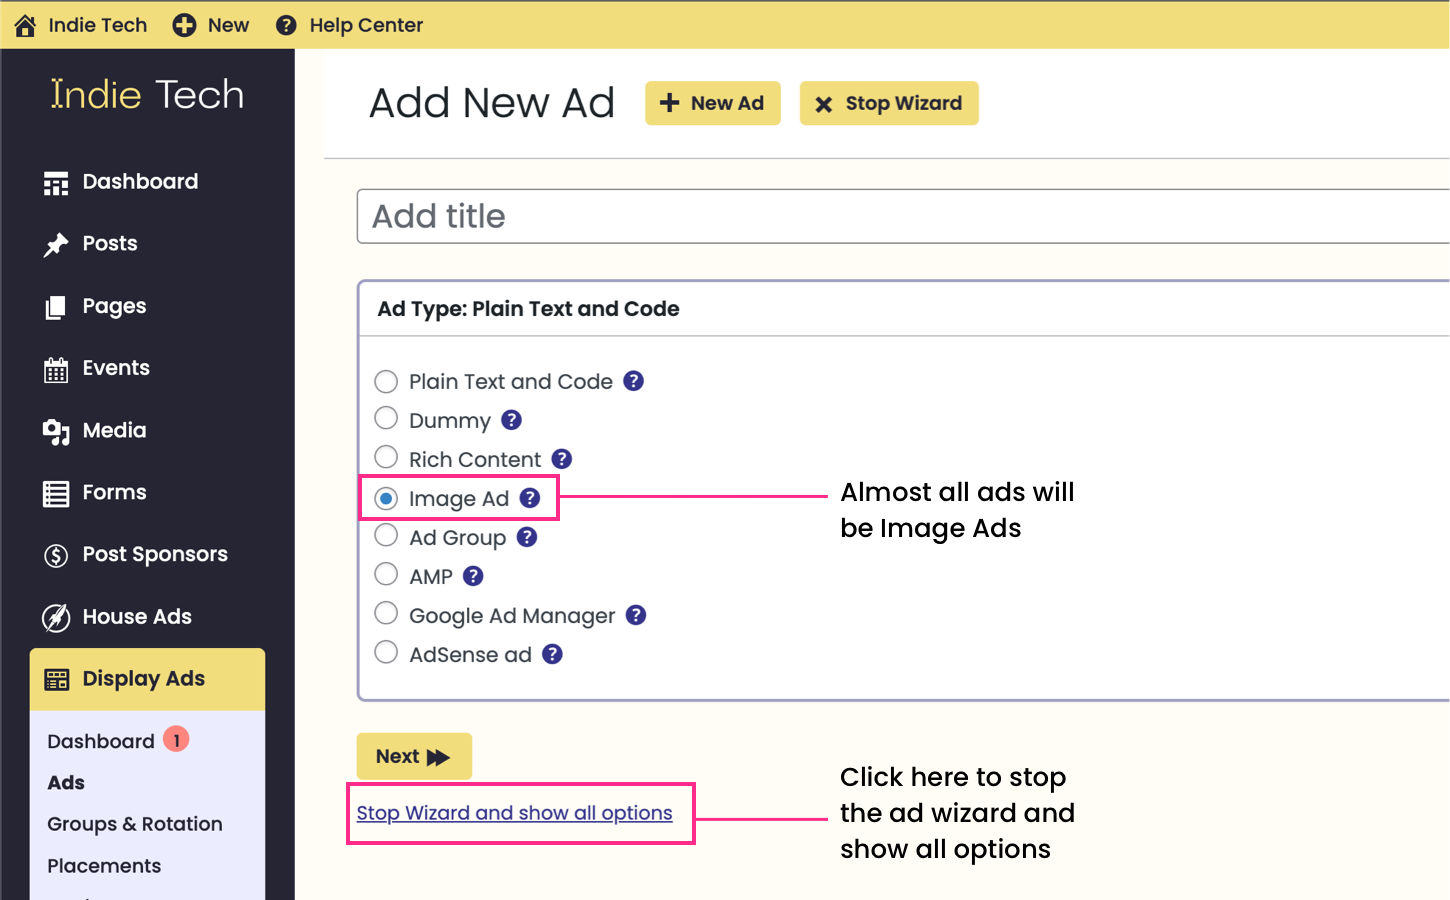
Click +New Ad up at the top of the page. If the setup wizard is running, click Stop Wizard so that all options are displayed on the screen.
-
In the Ad Type box, select Image Ad.


You are now ready to build your image ad.
Title
In this field, enter the name of your ad. It's always best to develop consistent naming conventions for your advertisements:
- It makes it easier to cross-reference ads with invoices in Stripe and when you are completing ad performance reports.
- Your ad performance is found in Google Analytics, having consistent naming conventions make it easier to retrieve the data.
- It is more efficient and will reduce confusion.
- It makes it easier to share information with your team and with collaborators.
We recommend using something like [ADVERTISER NAME] - [CAMPAIGN] - [SIZE] - [MMM YYYY PUBLISHED], i.e. "Walmart - Easter Sale - Billboard - Jan 2024"
Ad Type
Display Ads is able to serve a variety of ad types. In this guide, we will cover serving standard image ads. To learn more about the other ad types, click here.
Ad Groups & Rotations
On the right side of the screen, under Publish settings, you can select which Ad Group & Rotations you want to assign your image ad to. In order for an ad to serve correctly, it must be assigned to at least one group or rotation.
- Archive: located at the top of the page on category and tag pages. This zone can accept leaderboard (728x90) and mobile banner (320x5) ad sizes.
- Header: located at the top of most pages on your website. This zone can accommodate billboard (970x250), leaderboard (728x90), and mobile banner (320x50) ad sizes.
- Inline: located between paragraphs of posts. This zone can accommodate any ad size, but small box or medium rectangle (300x250) is recommended.
- Sidebar: located on the right side of the screen. This zone can accommodate small box or medium rectangle (300x250) and half page (300x600) ad sizes.
Ad Parameters
-
Upload the ad image by clicking Select Image, the Insert File window will appear. Follow the instructions to upload a file from your computer.
-
Once the file has been uploaded, ensure it is checked off and click Insert.
-
The width and height of the ad image will now be populated with the image's actual size. Update these fields to the exact display size:
-
Billboard - 970x250
-
Leaderboard - 728x90
-
Mobile Banner - 320x50
-
Small Box/Medium Rectangle - 300x250
-
-
Under Target URL, paste in the destination URL for the ad. This is the website you want users to be redirected to if they click on an ad. Advertisers can include a UTM for additional tracking.
-
Leave all the remaining settings under Ad Parameters set to default.
Layout/Output
No changes need to be made to any of these settings unless with the exception of checking off Display Only Once. This option specifies that the display ad will only be shown once per page, even if it is assigned to a group or placement in multiple spots.
Targeting Conditions
Having a website that is mobile friendly is critical today as most website traffic comes from mobile devices. To provide the most value to advertisers, we recommend including desktop and mobile banner options together when an advertiser purchases a header display ad. The targeting conditions in Display Ads allow you to target ad placements based on the user’s browser width. This ensures that no matter how your site is being accessed, readers will have the best experience.
For example, if an advertiser buys a billboard size header ad, include the mobile banner as well. When you are building the ad images in your website, you would build two: one for users on desktops and tablets and one for users on mobile devices.
If you are creating a Billboard (970x250) or Leaderboard (728x90) image ad, set the Visitor Conditions to be optimized for desktops and tablets.
- Select Browser Width
- Choose Equal or Higher and type 768
If you are creating a Mobile Leaderboard (320x50) image ad, set the Visitor Conditions to be optimized for mobile devices.
- Select Browser Width
- Choose Equal or Lower and type 767
Publish settings
If you want to schedule an ad to start displaying in the future, click Edit beside Publish immediately.
- Select the date and time you would like the ad to start running on your website
- Click OK
If you would like the ad to expire after a certain date, check off Set Expiry Date.
- Select the date and time you would like the ad to stop running on your website.
- If no expiration date is set, ad will run indefinitely or until manually stopped
If you would only like the ad to appear on certain days of the week, check Set Specific Days
- Select that day(s) of the week you would like the ad to display. If you would like to select multiple days, hold CTRL while selecting.
- Click Publish or Schedule and your ads will go live!
🟠 Ads are delivered randomly based on preferred "weights". When multiple ads are assigned to a single placement/zone they will rotate.
*Here's a reminder of the correct image sizes and ad placements:
- Standard Ad Sizes
- Billboard (970 x 250)
- Leaderboard (728 x 90)
- Small box (300 x 250)
- Mobile banner (320 x 50) - replaces leaderboard and/or billboard on mobile
- Ad Placements
- Header is at the top of the pace (leaderboard, billboard, mobile banner)
- Sidebar is along the right side (small square)
- Inline is within an article on the website (all sizes)